Touching the ⚙️ button in the upper right corner of the HOME screen will open the settings screen. It is divided into four groups: "Time and Attendance Settings," "Salary Settings," "App-wide Settings," and "Other."
"Time and Attendance Settings," "Salary Settings," and "Other" are settings specific to the currently selected workplace/job. Only "App-wide Settings" will apply to all workplaces and all months.
Setting attendance hours
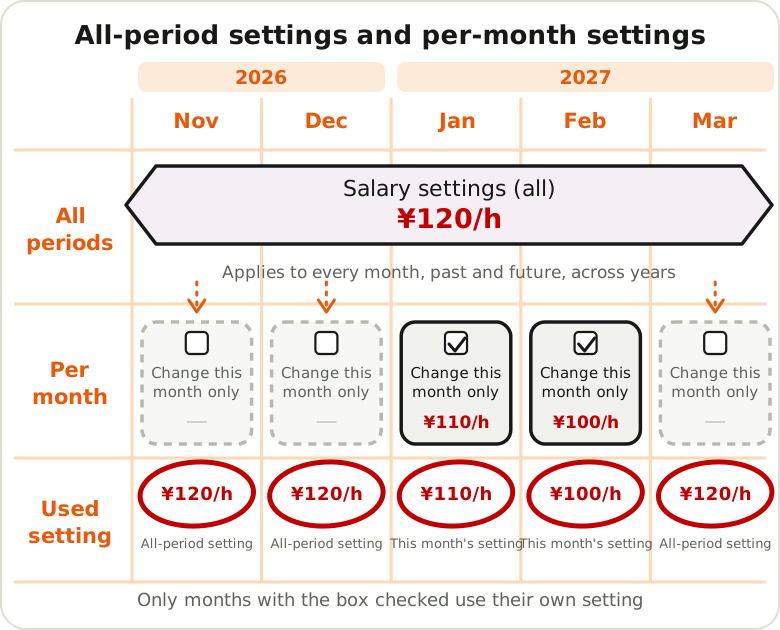
This setting controls clock-in/clock-out times, breaks, and overtime. You can choose between "All Periods" (the default setting) and "Change for This Month Only" ( monthly setting ).
Fixed time
The "Regular Hours" button on the Holidays tab allows you to set the start and end times for all registered events at once.
The times you set here will be automatically registered as your start and end times when you tap "Regular Hours" on the Holidays tab.
Setting overtime hours (overtime beyond legal limits)
If you work for more than the time set here (initial value 08:00), it will be calculated as overtime work beyond the legal limit.
*The legal Work time are set at 8:00 under the Labor Standards Act. Please do not change them unless there is a special reason.
Setting of legally mandated overtime hours
Any work performed beyond the time set here will be calculated as statutory overtime. Any actual Work time exceeding this limit, up to the statutory Work time (8:00), will be treated as statutory overtime.
Forced overtime (within legal limits)
By checking "Forcibly treat work before this time as overtime" and "Forcibly treat work after this time as overtime," and entering a reference time, you can forcibly treat work before (or after) that time as overtime.
Break time
You can register up to 5 breaks (Break 1 to Break 5), each with its own start and end time.
If you check the box that says "45-minute break for 6 to 8 hours of work, and a 1-hour break for work exceeding 8 hours," the break time will be automatically deducted according to the Work time, and the five break times you entered above will be ignored.
Checking "Cycle Break" will automatically add a specified number of minutes of break time after each specified period of work.
Flextime
If you check "Enable flexible Work time," the surplus or deficit of regular Work time will be displayed on the monthly (calendar screen.
About weekly working hours
This app has two settings for weekly working hours. They do very different things, so please do not confuse them.
- Weekly limit … for checking that you stay under a limit you set yourself. No effect on pay
- Statutory weekly hours … for judging overtime (premium pay). This one does affect pay
Weekly limit (display only)
This tells you how many hours you can still work this week. When you choose a limit, the time remaining is shown on Home and in Totals by job under "This week".
This setting is only used for display and does not affect overtime pay.
The choices are meant as guides for the following lines.
20 hours — social insurance threshold
If certain conditions are met, you become eligible for health insurance and employee pension, and the premiums are deducted from your pay.
However, eligibility is decided by your contracted working hours and the size of your workplace, not by the hours you actually worked. The paperwork is your employer's responsibility. Treat the number in this app as a guide.
28 hours — limit for permitted work outside status
This is the limit for international students and others working under permission for activities outside their status. It is an immigration rule, not a wage rule under the Labour Standards Act.
Because of that, working more than 28 hours does not create premium pay. You are paid your normal hourly rate. Since nothing shows up in the amount, going over is easy to miss, which is what this display is for.
The start day of the week, the type of workplace, and special rules during long holidays all matter. Please check the conditions of your own permission.
40 hours / 44 hours — statutory working hours
These are for checking your hours. If you want overtime to be calculated against them, set "Statutory weekly hours" below.
Statutory weekly hours (used for overtime)
This setting is used to judge overtime. It applies both to weekly overtime over the statutory hours and to the one-month variable working hour system.
- 40 hours … the rule. Most workplaces use this
- 44 hours … for exempt workplaces
Workplaces where it is 44 hours
Workplaces in the following industries that regularly employ fewer than 10 workers have statutory weekly hours of 44 (Labour Standards Act Article 40, Ordinance Article 25-2).
- Commerce (retail, wholesale and so on)
- Cinema and theatre (excluding film production)
- Health and hygiene (clinics, care services and so on)
- Hospitality and entertainment (restaurants, inns and so on)
Small restaurants, shops, hair salons and clinics often qualify. At such a workplace, hours beyond 40 are still within the statutory limit up to 44.
Please check with your employer whether your workplace qualifies.
The 8-hour day does not change
Even at a 44-hour workplace, the 8-hour daily limit is unchanged.
For example, even if your week totals only 20 hours, working 10 hours on one day means 2 of those hours qualify for premium pay. The weekly limit and the daily limit are judged separately.
An example of the two settings together
For an international student working at a restaurant with 9 employees:
- Weekly limit … 28 hours (permitted work outside status)
- Statutory weekly hours … 44 hours (exempt workplace)
If this person works 30 hours in a week, they are over their immigration limit, but all of the pay is at the normal hourly rate. No premium applies. The two lines sit in different places, which is why the settings are separate.
Start of the week
Which day the week starts on is set by the start day under "Weekly settings". The limit check, the weekly working hours and the weekly overtime all use that day.
Please note
The figures shown in this app are estimates. The limits and premium pay that actually apply to you depend on your work rules, labour-management agreements and employment contract. If you need a decision, please check with your employer or the Labour Standards Inspection Office.
Group Name
You can set up to 5 group names to be used in areas such as [the daily breakdown screen](#日\(今日、詳細\) .
Tapping this will open a dialog box where you can enter a "code or abbreviation" (a short name to be displayed in lists, e.g., "営業") and a "name" (the official name, e.g., "営業").
Please use this feature if you want to further categorize and summarize work tasks within your workplace.
Salary settings
You can set basic wages such as hourly or monthly rates, overtime and holiday pay rates, and allowances and deductions. You can choose between "for the entire period" and "change only this month" ( monthly settings ).
The following settings will change depending on whether you switch between "Statutory overtime Pay Mode" and "Fixed Hourly Wage Mode" at the top of the screen. Both are important functions, so we will explain them separately.
Statutory overtime pay mode (default)
This mode is designed for typical pay structures, where you choose a base salary (monthly, daily, or hourly) and then calculate your total pay by multiplying it by overtime, nighttime, and holiday pay rates (or amounts).
Employment type and base salary
Switch between "monthly wage, daily wage, and hourly wage" and enter the base amount.
Fixed hourly wage mode
The option to select employment type (monthly, daily, or hourly wage) has been removed, and the calculation is always based on an hourly wage.
In addition to setting premium and overtime rates , the following two items will be added that allow you to change the hourly wage itself depending on the time of day.
Weekday hourly rate
For weekdays, you can set up to 5 different hourly rates for different time slots (start to end). For example, you can use this to directly specify the hourly rate for a particular time slot, separate from the calculation of the nighttime rate multiplier, such as "1200 yen from 18:00 to 22:00".
Holiday hourly rate
You can set different hourly rates for up to five different time slots on the holidays and public holidays specified in the holiday settings .
Setting premium and overtime rates
These settings are common regardless of the mode. Switch between yen and multiplier in "Amount Unit," then configure the following:
- Base rate / Late-night rate
- Statutory overtime rate / Late-night overtime rate (If you check "Use overtime rate as legal overtime rate," the same rate will be used for legal overtime as well.)
- Holiday rate, holiday late-night rate, statutory holiday rate, statutory holiday late-night rate
*All prices are per hour. For daily or monthly wages, please enter the difference from the normal hourly rate.
Example: If the hourly rate is 1000 yen and the nighttime rate is 1200 yen, the answer is "200 yen".
Transportation
Set up the monthly and daily payment units and amounts.
allowance
You can set up allowances such as dependent allowance, regional allowance, commuting allowance, housing allowance, position allowance, and qualification allowance.
deduction
You can set the amounts for health insurance, public pension, employment insurance, income tax, resident tax, and other deductions.
App-wide settings
This setting will be applied to all workplaces and all months.
Notification (Master Switch)
This setting enables or disables the "Notify if input is missing" option. This is the overall master switch; the actual notification time is set in the other "Notifications" settings (workplace/job-specific settings).
You will only receive a notification if both the master switch and the settings for each workplace are turned ON.
Job title/work name
You can change the default workplace name and any added workplace/job names. You can use up to 5 workplace/job names for free (up to 30 with the feature upgrade plan). If you register multiple workplaces, they will be displayed in the workplace switching section at the top of the footer.
By touching the "Sort" button, you can freely change the display order of workplaces and job names using the ▲▼ buttons. The changed order will be reflected in displays such as workplace switching and workplace-specific summaries.
Startup settings
This setting determines the initial screen displayed when the app starts (such as the HOME screen) and the workplace/job that will be selected first if the user has multiple workplaces.
Other
This setting configures the detailed display and input behavior for the currently selected workplace and job.
Clock-in and clock-out buttons in the list
This setting determines how the time is rounded when you touch the "Clock In" or "Clock Out" buttons on the HOME screen or list screen .
You can specify the rounding direction (do nothing, round up, round down, round to the nearest integer) and the rounding time (in minutes) for both clocking in and clocking out.
Tags, shift names and times
You can set up to 8 tag names, start times, and end times for the round buttons on the screen .
You can change the name and color of a tag by tapping on its name (the colored badge).
Besides the name (up to 3 characters) and the start and end times, a tag can also have a break, an allowance, a color and a notification. The allowance is an amount added automatically when you put the tag on a day, and the break is entered only when that day's break is still empty.
Tags are not only for shift names such as "Early" and "Late". You can also use them to tell kinds of work apart, such as business trips, remote work and training. For examples, see "Can I record business trips, remote work and other ways of working that are not shifts?" in the FAQ.
Notes
- A day can have only one tag. Pressing another tag replaces that day's tag and times.
- If you press a tag whose start and end times are empty (a name-only tag), the day's start and end times become empty.
Notification (times vary by workplace)
For this workplace/job, you can set whether to send a notification if you haven't recorded your clock-out time, and the actual notification time.
If you uncheck this box, you will not receive notifications for this workplace, even if notifications are turned on in the app's overall settings . This is useful if you have multiple jobs and don't want notifications for some of them, or if you want to change the notification time for each workplace.
Time dialog times
Set up the time using the four buttons displayed on the left side of the multi-function time picker dialog .
Each button can be assigned a different time for entering the start time and the end time.
Closing date
Set up the calculation date to match your company's payroll period (e.g., closing date is the 21st of the month, and closing date is the 20th of the following month).
You can choose "end of month" (default) or from the 1st to the 31st.
For example, setting "21st" will treat the period from the 21st of the previous month to the 20th of the current month as a single aggregation period. This setting will be reflected in all aggregations that span across months, including monthly (calendar, [list](#一覧\(リスト\) , and aggregation/save .
If you select a closing date other than the end of the month, you can choose whether to display the closing period as "Current Month Closing" or "Next Month Closing."
Please note that the closing date is not fixed by month or lock (closing) date. Changing it will change the closing date for all aggregation periods, including past months, and will also change past aggregation results and PDF content. If there are locked months, a confirmation will be displayed before making any changes, so please check the contents before proceeding.
For example, if the closing date is the 15th of the month, the period from March 16th to April 15th will be displayed as April for "current month closing" and as March for "next month closing".
Holiday settings
You can check multiple regular closing days for each day of the week under "Basic Holidays".
When you select a day of the week as a "statutory holiday," the statutory holiday rate set for your pay will be applied to work performed on that day.
If you want to change it on a daily basis (for example, for substitute holidays), you can do so by checking the "Statutory Holiday" box on the "Holidays" card in the daily screen.
Calendar display
This setting allows you to configure the starting day of the week (Sunday, Monday, etc.) and the display range (show until the closing date, etc.) for [the monthly (calendar)](#月\(カレンダー\) screen.
By month settings
Normally, the "All Periods" setting is used as is, but if you check "Change the setting only this month" on the "Change the setting only this month" screen for both attendance time settings and salary settings, you can use settings that are independent for that month only.
If you open the "All Time" screen while the checkbox is checked, a message to that effect will be displayed, and the changes will not be reflected.
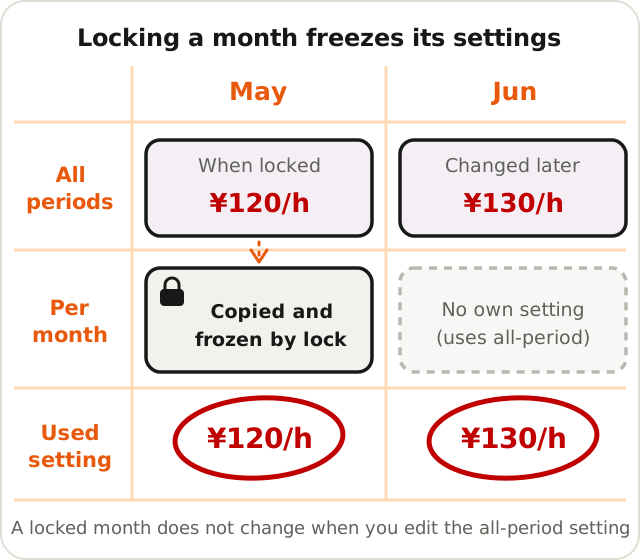
Please note that if you lock the settings using "Close this month" in the menu of the info (ⓘ) button at the top right, the settings for "all periods" at the time of locking, along with the workplace and job name, will be automatically copied and fixed as settings specific to that month. For more details, please see the instructions on how to change settings while retaining past payroll data .